Real-Time Object Detection with YOLO and Python
Learn real-time object detection with YOLO in Python: bounding boxes, confidence scores, video inference, and tracking objects across frames.
Real-time object detection means finding and labelling every object in a video fast enough that the result is still useful when it arrives: typically at least 25 to 30 frames per second. A detector that takes two seconds per image is a research tool. One that keeps up with a camera is a product.
This guide shows how to do it with YOLO and Python. You will learn what a detection actually contains (a box, a class, and a confidence score), how overlapping boxes are cleaned up, how to run a model on images and live video, and how to add tracking so the same car keeps the same ID from frame to frame. It also covers the mistakes that waste the most time, and the limits you should know before deploying anything.
What Is Object Detection?
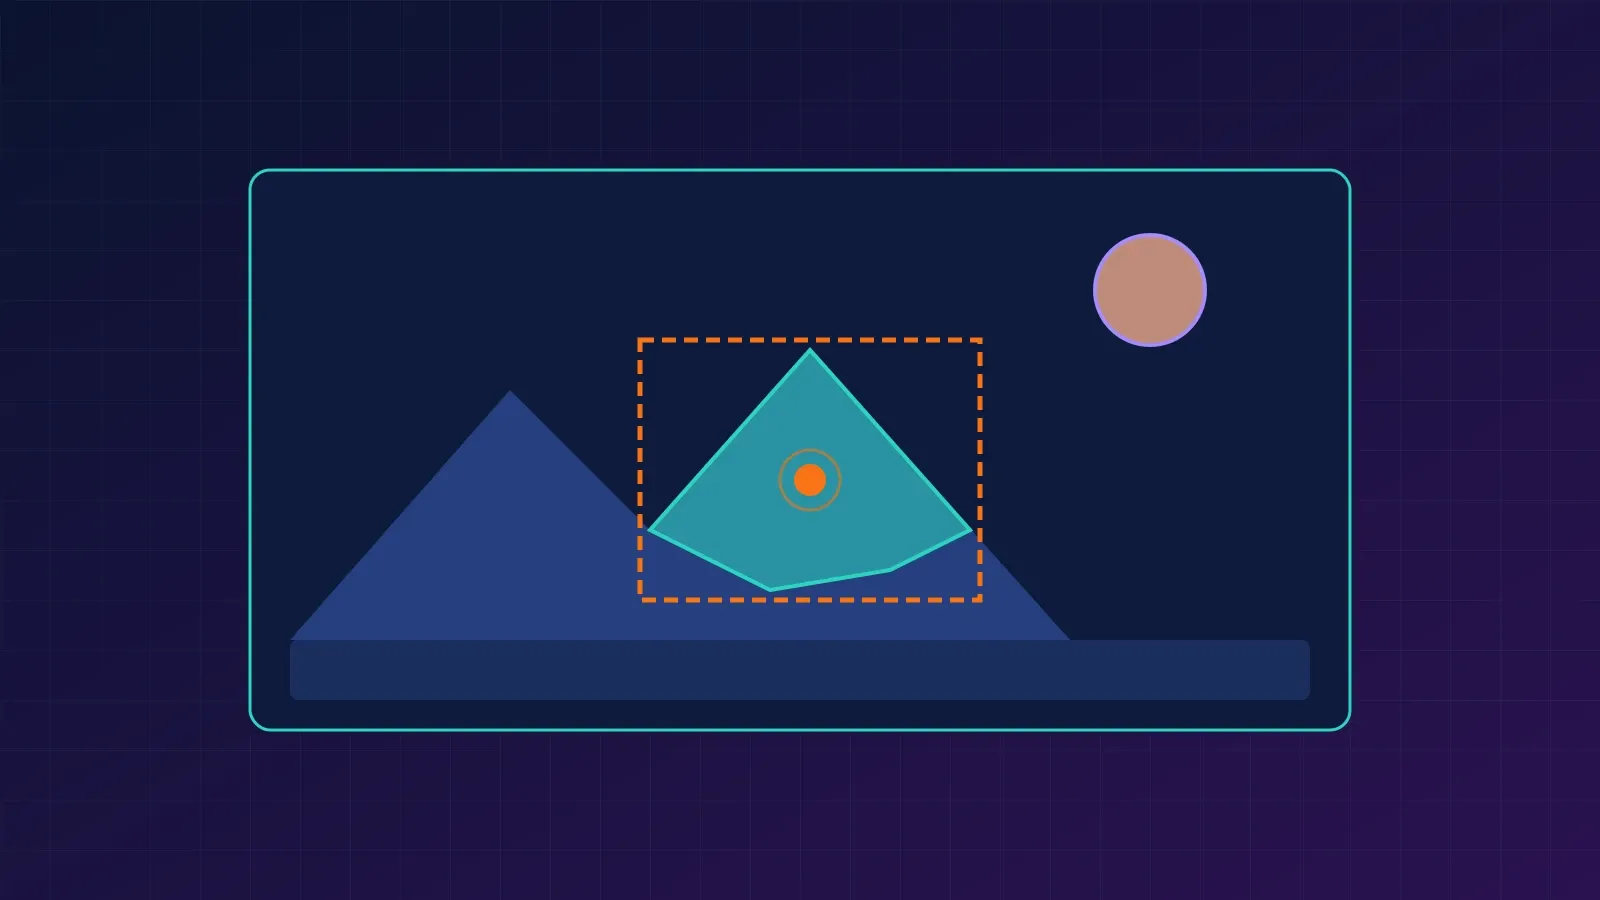
Object detection answers two questions at once: what is in the image, and where. For each object, a detector returns three things:
- A bounding box, usually four numbers:
x1, y1, x2, y2(top-left and bottom-right corners, in pixels). - A class label, such as “car” or “person”.
- A confidence score between 0 and 1: how sure the model is about that detection.
It sits between two neighbouring tasks. Classification gives one label for the whole image and says nothing about location. Segmentation gives an exact pixel mask per object, which is more detailed and more expensive. Detection is the practical middle ground and the usual first step in video analytics.
Why YOLO Is Fast
YOLO stands for “You Only Look Once”. Older detectors worked in two stages: first propose candidate regions, then classify each one. YOLO-style models predict boxes and classes for the whole image in a single forward pass of one network, which is a large part of why they suit real-time work.
Speed is a budget. If your camera runs at 30 frames per second, each frame must be fully processed in about 33 milliseconds, because ms. At 60 FPS the budget shrinks to about 16.7 ms. Everything in your loop counts against that budget: reading the frame, running the model, drawing boxes, and displaying the result.
From Frame to Tracked Object
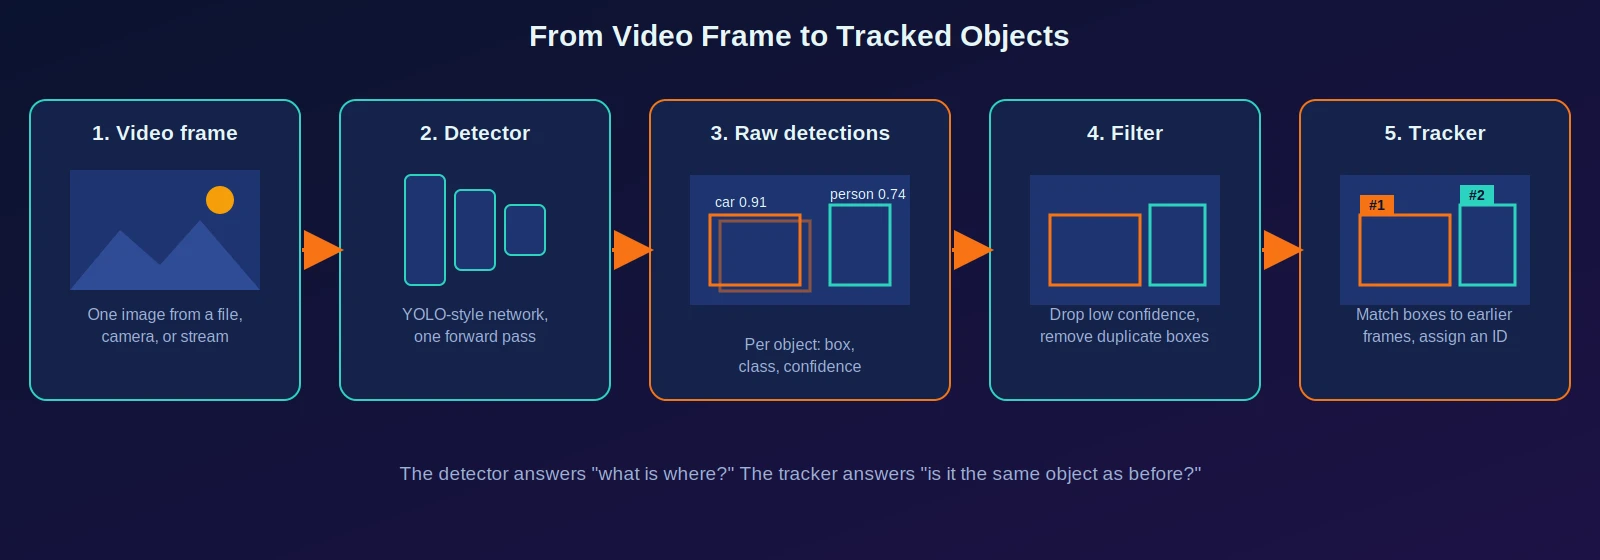
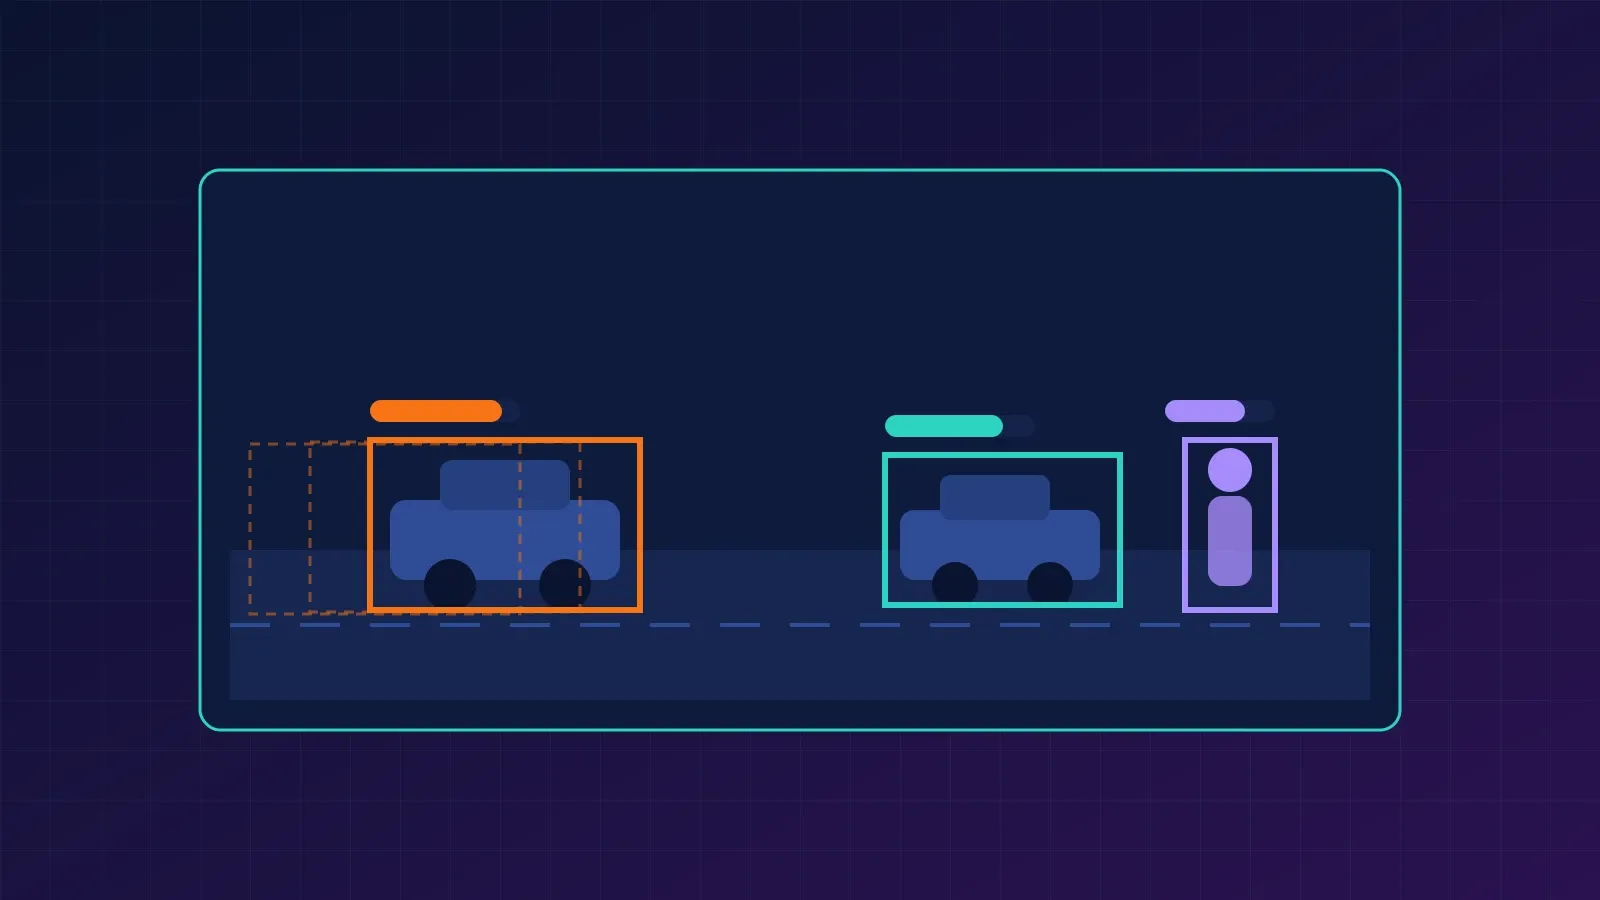
Detection works on one frame at a time and has no memory. Tracking adds the memory: it links detections across frames so “the car at frame 10” and “the car at frame 11” are recognised as the same object. That is what lets you count unique vehicles, measure how long someone stays in an area, or follow an object through a scene.
Understanding Detection Outputs
Confidence threshold
Every detection comes with a score, and you choose a cut-off. A low threshold (for example 0.1) finds more objects but adds false alarms. A high threshold (for example 0.7) is cleaner but misses harder objects.
| Threshold | You get | Typical use |
|---|---|---|
| Low (0.1 to 0.25) | More detections, more false positives | Exploring, safety-critical “don’t miss anything” cases |
| Medium (about 0.25 to 0.5) | A balance | General demos and development |
| High (0.6 and above) | Fewer, more certain detections | Alerts, counting where false alarms are costly |
There is no universally correct value. Pick it by testing on footage that resembles your real use case.
Intersection over Union (IoU)
IoU measures how much two boxes overlap:
It ranges from 0 (no overlap) to 1 (identical boxes). IoU is used in three places in this article: scoring a predicted box against the true box, removing duplicate detections, and matching boxes between frames for tracking.
Non-maximum suppression (NMS)
Detectors often produce several boxes for the same object. Non-maximum suppression keeps the highest-scoring box and removes boxes that overlap it too much. This tiny implementation, followed by real output, shows exactly what it does:
def iou_xyxy(a, b):
    """IoU of two boxes given as (x1, y1, x2, y2)."""
    x1, y1 = max(a[0], b[0]), max(a[1], b[1])
    x2, y2 = min(a[2], b[2]), min(a[3], b[3])
    inter = max(0, x2 - x1) * max(0, y2 - y1)
    area = lambda r: (r[2] - r[0]) * (r[3] - r[1])
    union = area(a) + area(b) - inter
    return inter / union if union else 0.0

def nms(boxes, scores, iou_thr=0.5):
    """Keep the highest-scoring box, drop boxes that overlap it too much, repeat."""
    order = sorted(range(len(boxes)), key=lambda i: scores[i], reverse=True)
    keep = []
    while order:
        best = order.pop(0)
        keep.append(best)
        order = [j for j in order if iou_xyxy(boxes[best], boxes[j]) < iou_thr]
    return keep

# Two overlapping boxes on one object, plus one separate object
boxes  = [(100, 100, 200, 200), (110, 105, 210, 205), (300, 300, 380, 380)]
scores = [0.90, 0.80, 0.70]
print("IoU of first two boxes:", round(iou_xyxy(boxes[0], boxes[1]), 3))
print("kept after NMS:", nms(boxes, scores, iou_thr=0.5))
Output:
IoU of first two boxes: 0.747
kept after NMS: [0, 2]
The first two boxes overlap with an IoU of 0.747, above the 0.5 threshold, so the lower-scoring one (index 1) is removed. The third box is far away and survives. Many classic YOLO versions run NMS as a post-processing step. Newer models such as YOLO26 are designed around end-to-end, NMS-free inference according to Ultralytics, which simplifies deployment. Exact default behaviour and options have changed between releases, so check the current documentation for your version.
Precision, recall, and mAP
Two numbers describe detection quality. Precision is the share of detections that are correct. Recall is the share of real objects that were found. Raising the confidence threshold usually raises precision and lowers recall. mAP (mean Average Precision) summarises the trade-off across classes and thresholds and is the standard benchmark number. When comparing models, compare mAP on your own data, not just the numbers on a model card.
Setup
Install the Ultralytics package, which provides the YOLO models, the training and inference API, and built-in trackers:
pip install ultralytics opencv-pythonThe current Ultralytics documentation uses the YOLO26 family. Model files come in sizes n, s, m, l, and x, from smallest and fastest to largest and most accurate. Start with the smallest, yolo26n.pt. The weights download automatically the first time you load them.
A note on licensing: Ultralytics offers an Enterprise License for commercial use. If you plan to ship a product, read the licence terms for the code and the weights before you build on them.
Step 1: Detect Objects in an Image
Put a photo called street.jpg in your working folder.
import cv2
from ultralytics import YOLO

model = YOLO("yolo26n.pt")

results = model("street.jpg", conf=0.25)   # conf = minimum confidence to keep
r = results[0]                             # one Results object per image

for box in r.boxes:
    class_id = int(box.cls[0])
    name = r.names[class_id]
    confidence = float(box.conf[0])
    x1, y1, x2, y2 = box.xyxy[0].tolist()
    print(f"{name:<12} {confidence:.2f}  ({x1:.0f}, {y1:.0f}, {x2:.0f}, {y2:.0f})")

annotated = r.plot()                       # image with boxes and labels drawn (BGR)
cv2.imwrite("street_detected.jpg", annotated)
You will see one line per detected object, with its class, a confidence between 0 and 1, and the box corners in pixels. The exact objects and numbers depend on your photo. The model uses the 80 COCO classes, so it recognises categories such as person, car, bicycle, and dog, and nothing outside that list unless you train it on your own data.
Step 2: Run Detection on Live Video
Reading frames yourself with OpenCV gives you control over the loop and makes it easy to measure speed:
import time
import cv2
from ultralytics import YOLO

model = YOLO("yolo26n.pt")
cap = cv2.VideoCapture("traffic.mp4")      # use 0 for the default webcam

while cap.isOpened():
    ok, frame = cap.read()
    if not ok:
        break

    start = time.perf_counter()
    results = model(frame, conf=0.3, verbose=False)
    annotated = results[0].plot()
    fps = 1 / (time.perf_counter() - start)

    cv2.putText(annotated, f"{fps:.1f} FPS", (10, 30),
                cv2.FONT_HERSHEY_SIMPLEX, 1, (0, 255, 0), 2)
    cv2.imshow("YOLO detection", annotated)
    if cv2.waitKey(1) & 0xFF == ord("q"):
        break

cap.release()
cv2.destroyAllWindows()
The FPS shown measures model inference plus drawing for one frame. It will vary a lot between a laptop CPU and a GPU, so measure on your own hardware instead of relying on published figures. If you are below your target, use a smaller model, lower the input size, or skip frames.
Step 3: Track Objects Across Frames
Swap model(...) for model.track(..., persist=True). The persist=True argument tells the tracker to remember the previous frames, which is what keeps IDs stable. Ultralytics supports two trackers, BoT-SORT and ByteTrack, selected with a YAML file name.
import cv2
from ultralytics import YOLO

model = YOLO("yolo26n.pt")
cap = cv2.VideoCapture("traffic.mp4")
seen_ids = set()

while cap.isOpened():
    ok, frame = cap.read()
    if not ok:
        break

    results = model.track(frame, persist=True, tracker="bytetrack.yaml",
                          conf=0.3, verbose=False)
    r = results[0]

    if r.boxes.id is not None:                    # None when nothing is tracked yet
        ids = r.boxes.id.int().cpu().tolist()
        seen_ids.update(ids)
        for box_id, box in zip(ids, r.boxes):
            name = r.names[int(box.cls[0])]
            print(f"#{box_id} {name} {float(box.conf[0]):.2f}")

    annotated = r.plot()
    cv2.putText(annotated, f"Unique objects so far: {len(seen_ids)}", (10, 30),
                cv2.FONT_HERSHEY_SIMPLEX, 1, (0, 255, 0), 2)
    cv2.imshow("YOLO tracking", annotated)
    if cv2.waitKey(1) & 0xFF == ord("q"):
        break

cap.release()
cv2.destroyAllWindows()
print("Total unique tracked objects:", len(seen_ids))
To track only people, add classes=[0] to the track() call; class 0 is “person” in the COCO label set. Each tracked box now carries an ID, so counting unique IDs approximates counting unique objects, with the caveats in the limitations section below.
Note: the Ultralytics snippets above follow the patterns in the official documentation (YOLO("yolo26n.pt"), model.track(frame, persist=True), the bytetrack.yaml option), but they were not executed while this article was prepared, because model weights could not be downloaded in the writing environment. Only the NumPy examples in this article were run, and their output is real. Run the rest on your machine and check your installed version.
How Tracking Works
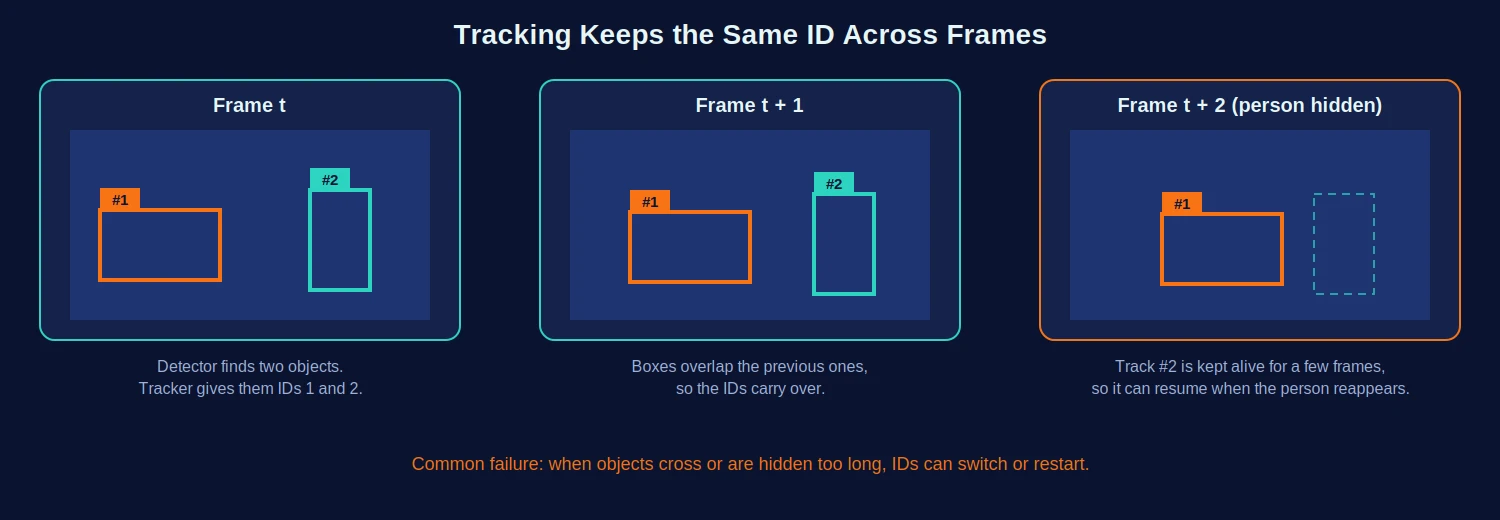
Trackers such as ByteTrack and BoT-SORT are more sophisticated than what follows, but the core idea is the same: predict where each known object should be now, then match the new detections to those predictions, mostly by overlap. Matched detections keep their ID, unmatched ones start a new ID, and tracks with no match are kept alive for a few frames before being dropped.
Here is a deliberately simple version using only IoU matching, so you can see the mechanics:
class IoUTracker:
    """Greedy tracker: match each detection to the existing track it overlaps most."""
    def __init__(self, iou_thr=0.3, max_age=2):
        self.iou_thr, self.max_age = iou_thr, max_age
        self.tracks, self.next_id = {}, 1

    def update(self, boxes):
        pairs = sorted(
            ((iou_xyxy(t["box"], b), tid, d)
             for tid, t in self.tracks.items() for d, b in enumerate(boxes)),
            reverse=True)
        used_t, used_d, assigned = set(), set(), {}
        for score, tid, d in pairs:
            if score < self.iou_thr:
                break
            if tid in used_t or d in used_d:
                continue
            self.tracks[tid].update(box=boxes[d], missed=0)
            assigned[d] = tid
            used_t.add(tid); used_d.add(d)
        for tid in list(self.tracks):                 # age unmatched tracks
            if tid not in used_t:
                self.tracks[tid]["missed"] += 1
                if self.tracks[tid]["missed"] > self.max_age:
                    del self.tracks[tid]
        for d, b in enumerate(boxes):                 # new objects get new IDs
            if d not in used_d:
                self.tracks[self.next_id] = {"box": b, "missed": 0}
                assigned[d] = self.next_id
                self.next_id += 1
        return [assigned[d] for d in range(len(boxes))]

# 4 frames: the person is hidden in frame 2; a bike appears in frame 3
frames = [
    [(100, 100, 180, 160), (300, 200, 330, 280)],
    [(110, 102, 190, 162), (302, 204, 332, 284)],
    [(121, 104, 201, 164)],
    [(132, 106, 212, 166), (306, 212, 336, 292), (500, 300, 560, 350)],
]
tracker = IoUTracker(iou_thr=0.3, max_age=2)
for i, f in enumerate(frames):
    print(f"frame {i}: ids = {tracker.update(f)}")
Output (this reuses the iou_xyxy function from the NMS section):
frame 0: ids = [1, 2]
frame 1: ids = [1, 2]
frame 2: ids = [1]
frame 3: ids = [1, 2, 3]
The car keeps ID 1 throughout. The person is missing in frame 2 but their track is kept alive, so when they reappear in frame 3 they correctly get ID 2 again, and the new bike gets ID 3. With max_age=0 the person would have been forgotten and re-registered as a new object, which is exactly how counting errors happen. This simple tracker has no motion model, so it fails when objects move far between frames or cross each other; real trackers add motion prediction and smarter matching.
Choosing Settings
| Goal | What to adjust | Trade-off |
|---|---|---|
| Higher FPS | Smaller model (n), smaller input size, GPU, skip frames | Lower accuracy, especially on small objects |
| Fewer false alarms | Raise conf | More missed objects |
| Find small or distant objects | Larger model or larger input size | Slower |
| Stable IDs in crowded scenes | Try the other tracker (BoT-SORT or ByteTrack), tune the tracker YAML | More compute, more tuning |
| Detect your own objects | Fine-tune on a labelled dataset | Needs labelled images and training time |
Common Mistakes and Troubleshooting
- Forgetting
persist=True. Without it, IDs restart and tracking looks broken. - Assuming
boxes.idalways exists. It can beNoneearly on or when nothing is tracked. Check before using it. - Colour confusion. OpenCV frames are BGR.
r.plot()returns a BGR image that works withcv2.imshowandcv2.imwrite; convert before passing it to libraries that expect RGB. - Judging a model from one clip. Test on footage from your real camera, lighting, and distance.
- Webcam does not open. Try index
0,1, or a video file. Check that no other program is using the camera. - Low FPS on CPU. Use the nano model, shrink the input, or process every second frame.
- Treating unique IDs as exact counts. ID switches inflate the number; missed detections reduce it. Validate against a manual count on a sample clip.
Limitations and Risks
- Small, blurry, or partly hidden objects are detected less reliably.
- Domain shift. A model trained on daytime street scenes can fail at night, in rain, or from a drone’s viewpoint.
- Fixed class list. A COCO-trained model only knows its 80 classes unless you fine-tune it.
- ID switches. When objects cross paths or disappear for long, trackers can swap or restart IDs.
- Bias and errors. Detectors can perform unevenly across environments and groups of people.
- Privacy and law. Tracking people raises consent, data-protection, and surveillance questions that depend on the country. In the EU, for example, data-protection rules apply. Get proper advice before deploying person tracking.
- Hardware variability. Reported speeds depend heavily on hardware and settings. Always benchmark yourself.
Frequently Asked Questions
What is the best YOLO model for real-time detection?
There is no single best. Smaller models are faster and larger ones are more accurate. Start with the nano model, measure FPS and accuracy on your footage, and move up a size only if you need to.
What is the difference between detection and tracking?
Detection finds objects in a single frame. Tracking links detections across frames so each object keeps the same ID.
Do I need a GPU for real-time object detection?
Not always. Small models can reach usable speeds on a modern CPU, but a GPU gives much more headroom, especially for larger models or high-resolution video.
How do I only detect certain objects?
Pass the classes argument, for example classes=[0] for people in the COCO label set.
Can I detect objects that are not in the COCO classes?
Yes, by fine-tuning a model on your own labelled images, or by combining a detector with other models, as covered in related articles on vision-language models and segmentation.
Where to Go Next
- Run Step 1 on ten of your own images and compare results at three confidence thresholds.
- Measure FPS for two model sizes on your machine and plot accuracy against speed.
- Count unique people or vehicles in a short clip, then compare with a manual count.
- Compare ByteTrack and BoT-SORT on a crowded clip and note where IDs switch.
- Fine-tune a small model on a custom class.
References
- Ultralytics documentation: Multi-Object Tracking with Ultralytics YOLO
- Ultralytics documentation: YOLO26 models
- Ultralytics documentation: Home and quickstart
- Redmon et al., You Only Look Once: Unified, Real-Time Object Detection
- Zhang et al., ByteTrack: Multi-Object Tracking by Associating Every Detection Box
- Aharon et al., BoT-SORT: Robust Associations Multi-Pedestrian Tracking